
I’ll start this off by saying that I like to think of myself as being very organised. I just said that in my head, then laughed out loud, when I consider that I actually have collections of paperwork and ‘stuff’ lying about everywhere in the house that needs ‘organised’.
However, when it comes to my kitchen under-sink cupboard, organisation is rife. I run a tight-ship in that cupboard and I, sadly, take massive pride in keeping everything inside it under control and organised. I know, I need a life!
I remember posting a photo of the under-sink area on my Instagram page for the first time – in the early days of the page’s existence – and everyone went MAD over it! Turns out there’s LOTS of like-minded people out there, who also like things to be neat and tidy, especially when it comes to cleaning supplies! Even if you’re not that way inclined, you can easily jump on the organisation band-wagon with very little effort (and cost) required!
I thought it would be useful to share with you all, since I’ve had so many questions over it, how I managed to organise the under-sink cupboard for under £10 with storage ideas that will completely revolutionise the way you organise your cupboard space in your kitchen/utility room!
Let’s get started.
YOU’LL NEED:

1X VARIERA Shelf Insert White – IKEA – £3.00: http://www.ikea.com/gb/en/products/kitchen-products/kitchen-organisers-shelves/variera-shelf-insert-white-art-60136623/
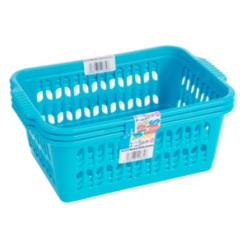
3X Storage Baskets – The Range – £2.29: https://www.therange.co.uk/furniture-and-storage/storage/storage-boxes/storage-baskets/wham-plastic-storage-baskets#422830
I used 5X Storage Baskets but it depends on the size of the under-sink space! I’d suggest measuring it out before you buy. I should add, you can purchase any style storage basket you like – these are just the ones I used, which sadly don’t come in black anymore!
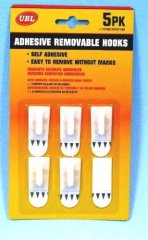
Sticky-hooks – Amazon – £2.01: https://www.amazon.co.uk/Self-Adhesive-Removable-Hooks-HY0084/dp/B001EGRCGE (if you prefer, you can buy stronger Command hooks for a bit more money – as the space can get warm and the hooks may fall off if you hang heavy items on them)
STEP 1: EMPTY THE CUPBOARD!

There’s a LOT of ‘stuff’ inside any under-sink cupboard. The best thing to do is EMPTY it all out and begin from there. Having all the cupboard contents out on the floor makes it much easier to organise what you want inside each basket!
TIP: This is the perfect opportunity to get rid of anything in there that you don’t need, like the 10-year-old oven cleaner that’s really seen better days. Make space for items you ACTUALLY use!
STEP 2: SET YOUR CUPBOARD LAYOUT!
You have your empty cupboard, you have your storage baskets, shelve(s) and hooks – now it’s time to set it out how you’d like it, or set it out in a way that you can maximise the space you have.
Our under-sink cupboard isn’t the largest so it was important to organise it properly to make the most of the space we have.
It may take a little time to actually decide on the layout – as you’ll need to consider the height of the cleaning products you have too! Here’s how I set out mine below.


STEP 3: START ORGANISING!
Here’s a little look into how I organised the storage baskets. It’s important to consider at this stage, what your ‘go-to’ items are. For example, products you use often should be easily accessible, at the front. I started off with getting rid of any unnecessary packaging – starting with the dishwasher tabs:


The dishwasher tabs get used often of course, so it was essential that these were positioned in the basket on the lower level, in a basket that could easily slide in and out! Dishwasher salt rarely gets used, so that goes to the back! The width of the shelf from IKEA gives a perfect gap/space for bin-bags, easy to grab when needed and also a space for the window-cleaning thingy that I don’t know the name of – pictured above.
I’m an absolute LOSER for microfibre cloths. I swear by them. I buy mine from the likes of Home Bargains, 3 Pack for £2 etc. I also LOVE e-Cloths and swear by them, if you haven’t tried them – you need to. They make cleaning much quicker and easier. I use the Glass Polishing cloth and Bathroom Cleaning cloth religiously. I have high-gloss kitchen units and the Glass Polishing e-Cloth is perfect for getting smear-free doors! It also works on chrome taps, door handles, windows and so on! Best money I’ve ever spent! Here’s the link to the e-Cloth website (I got mine from Amazon): https://www.e-cloth.com/


So I’ve made it clear that I kinda like microfibre cloths.. I have quite a few, so the best way to organise them I find is to fold them and separate by use: 1 basket for using to wash/clean items, 1 basket for using to dust/buff items. I only had enough to fill 1 and a half baskets, so I used a posh-chocolates tray (thanks Lindt!) to separate the cloths from other ‘bits and pieces’ that I also had to organise! Recycling and all that jazz. Also, apologies for the unintentional middle-finger, pictured presenting the Lindt tray below! *facepalm emoji*


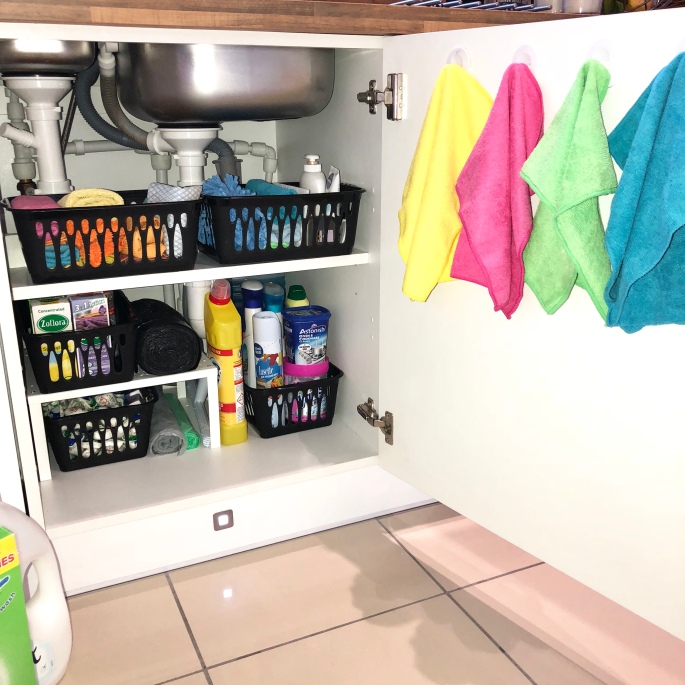
This is where the Sticky Hooks come into play – I used 4 and I hang assorted microfibre clothes here for quick-use round the house! This is what it looks like, all in place:


And finally, the last two baskets to be organised. My beloved Zoflora (yup, we know, I’m a big fan!) and other cleaning products I use from time-to-time:


Is it just me who finds these before and afters soooo very pleasing to the eye? With those two final baskets in place, here’s how the area looks:
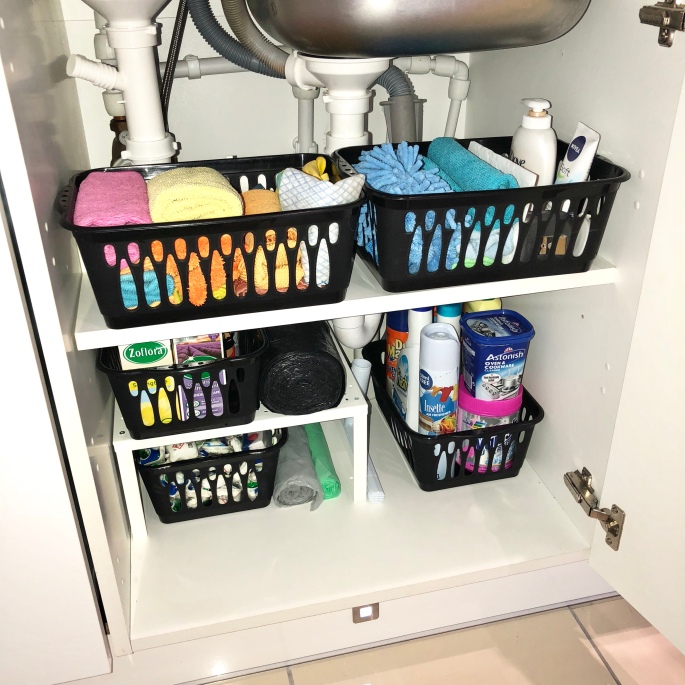
You can see from the photo above that with all the items in place, there’s some additional gaps and space that can be used for, well, anything really. Most importantly of all, on the lower level there’s a massive space in front of the baskets – which is perfect for bulky items like the washing powder and conditioner. We don’t have a utility room and the kitchen cupboard (walk-in cupboard) is actually Hero (our dog’s) bedroom, so the under-sink cupboard is really the only space we have for cleaning essentials – so we have to think smart with space!

STEP 4: ADMIRE THE RESULTS!
And there you have it! That’s my (long-winded) insight into my under-sink organisation for under £10! It only took me 30 minutes to organise this space, so don’t think it’s a task that will take hours! It’s soooo worth it and I’d highly recommend doing it, especially if you’re planning a ‘Spring Clean’ – start it off right by getting your cleaning supplies in order. Also, if you’re someone who thrives off organising a space – this is definitely one to try out.
Hope you enjoyed reading and gained some tips/inspiration from this! Please let me know your thoughts by commenting below, it means the world!
If you give organising your under-sink cupboard a go, remember to tag me or send me a photo – as I’d love to see your results!
With hugs and thanks,
Craig 🙂

Hey craig that was great !! Congratulations – this blog is going to be amazing your hard work will certainly pay off !! Look forward to many more tips and idea’s 😀😙 xx
LikeLiked by 1 person
Thank you so much!!! Really appreciate the kind words Karen 😊 x
LikeLike
I remember seeing your picture of this on Instagram ages ago, getting all inspired and buying some baskets but my cupboard definitely needs a good sort out as it’s nowhere near as neat and tidy as this! Great post, so excited you have a new blog! 😊
LikeLiked by 1 person
Aw thank you so much!!! Time to get organising then 🤪 have fun! X
LikeLiked by 1 person
**runs to the shop to get more organisational boxes** love this babe! X
LikeLiked by 1 person
Aw stop as if you’ve read my blog I could cry 😫 you babe! Thank you xxx
LikeLike
How does the IKEA thing stay in place? Is it screwed in?
LikeLike
It’s a pretty sturdy, metal frame – weighs a bit so it doesn’t move easily. The frame is screwed but don’t think there’s the option to screw the base to the cabinet! 😊
LikeLike
Sorry I meant the shelf bit
LikeLike
That shelf is part of the unit, not from IKEA.
LikeLike
Aaah love your new blog 😍😍 Guess what I’ll be doing at the weekend ✨🌟💫
LikeLiked by 1 person
Ahhh thank you so so much! Glad you enjoyed 😊😍💕
LikeLike
I really enjoyed reading this! I’ve screenshotted pictures and will be putting them in the “new home” scrapbook for when we move. Thanks 👍🏼
LikeLiked by 1 person
Thank you so so much. So kind of you to say! 😍 good luck and please share once you do! Wish you the best with the new home 😊
LikeLike
This amount of organisation is super pleasing to the eye! Love the hanging microfibres. I’m off to buy some hooks!
LikeLiked by 1 person
Hehe! I’m glad you agree 🙈😂 I thought I was a loon! Love a bit of organisation! 😊
LikeLike
Love your organisation skills .. just wondered if your familiar or have heard of the Eco egg for washing .. it’s amaZing .. lasts about 3 years depending on your wash load amounts I use the blue one there about 19.99 and are worth every penny as you don’t have to buy wash powder or liquid again !
LikeLiked by 1 person
Oh wow I’ve not heard of this before! I must try! Thank you for the recommendation!! 😊
LikeLike